Monday, November 21, 2011

The Domnarski Farm – Building Your Own Barn

By Matthew J. Domnarski

This October, my wife, Lisa A. Domnarski began boarding as a sole proprietor at our newly constructed 36’ x 60’ twelve 10’ by 12’stall post and beam barn, at our home on 55 acres located at 77 Bacon Road, Palmer, Massachusetts. We started out with two horses at our house on 2.7 acres. Since 1991 we worked toward realizing every horse owner’s dream, having our own little horse farm. I wanted to share our experiences with fellow “The Trail Rider” readers, especially if they have contemplated a similar path, namely, building your own barn.

www.DomnarskiFarm.com Having a small horse farm (and helipad) is our dream come true!


It would have been nice to have a wagon-load of money and barn builder. I couldn’t afford that enormous of a loan so I decided to do it myself.

I’ll build it myself! If I can love the Red Sox, then building a barn is no problem!


Building my own barn was easy, and sometimes it was very hard. If that sounds like a contradiction, maybe it is. What I meant is the more I researched building my own barn, the more I realized that I could do it. Now that I’m finished and looking back, I think most people can do it too. It takes time, money and a strong back. I had a good plan and just kept plugging away. The result was well worth it.

Look at all that wood that I have to turn into a barn.


I learned that I should have covered the wood with tarps. Any leaves and pine needles that fell on the stacks caused some rotting.
One of the biggest challenges of building your own barn is that there is so much to do. I worked rather quickly, and it took just under one year to complete. But I figure, what’s one year out of the two hundred I expect the barn to stand?

I sunk this 2003 Sacagawea dollar coin for someone to find in a foundation post long after I’m gone!


First came the idea, then the plan. Since there’s lots to do, you need a good plan. Two formulae apply in the first stage, “the KISS principle” and “the 5 P’s”.
Keep It Simple, Stupid! Life is hard enough without making it more difficult. If you start to feel like you are getting in over your head, try to think of an easier way. I know that barn raisings often involve a crane or a couple hundred “friends” to hoist up each bent. For me, it was easier to use a backhoe and muster up one or two other workers to help. I could have hired an expensive crane and I could have organized an Amish-like crowd, but it was just easier to keep my plan small. Instead of hoisting up large bents, my barn builder (Greg Searfass) and I built the first floor, and then stacked on the second floor. We didn’t need more than the two of us or a crane.
Greg and I are proud that I’m five feet ten and he’s five-two, with only two hundred and 275 pounds between us. That’s all it took (and a backhoe) to complete the frame. Sure there was some heavy beams but using your brain can go farther than muscle.

I’m small, but Greg is even smaller! Two small guys and a decent sized backhoe!


I’m always busy. And my friends are too! Instead of driving yourself crazy, take this advice. Be pleased when friends show up to help but don’t count on them. I’ve had problems getting people I pay money to show up so I certainly don’t expect my busy friends to have much extra time. When my friends were kind enough to offer help, I always had a list of things they could do! Sometimes the best help is the friend that shows up with a spare coffee or can make a run to Home Depot for you.

Here’s my old man smoking a butt and helping out by drilling some holes when my wife isn’t threatening to spray him with the garden hose to put out...


... the cigarette in his face!

Proper Planning Prevents Poor Performance. I began organizing my ideas about what I was trying to accomplish. The great thing about writing things down on a computer is that you can cut and paste. You can brainstorm about goals, tasks and resources and then move them around on the screen to where they fit. Some ideas don’t fit at all and can be deleted. You can e-mail your friends with your preliminary ideas and get feedback. You can decide exactly what you want. The necessary steps and order begin to emerge on paper. Instead of your project becoming a big mistake, you can execute a step by step list that keeps you from forgetting critical items or being side tracked or lost. If you really want to be fancy on your planning, you can estimate how much time each task takes. That way, when you have two hours, you can quickly decide what you can do during that time.

The paint program on my computer cam in handy to visualize and plan fencing.

Not much flat land for a 36’ by 60’ barn. The terrain slopes down on all sides.


Anything larger would be more expensive, take longer to build and take up more space that we didn’t have. Anything small would be less cost effective. We figured on how many horses a full time Mom could manage with two young boys tugging at her heels. There would have to be enough stalls to rent out to recuperate the costs of building the barn, but not so many that the work was unmanageable.
Once we figured on size then it was time to learn about materials and the process. Fortunately, I’m a Trooper and I fly the state police helicopter. That means I drive and fly a lot, so I see lots of barns.

Protecting the Commonwealth, and noticing a few barns along the way….


When I saw a barn like something I wanted to build, I’d track down the location after work and ask the owner if I could have a barn tour. Everyone seemed happy to talk about their barn. I asked what they liked and what they would change. If they had a hand in building or repairing the barn, I asked how they did it. No sense in making the same mistakes that someone else did. Barn owners told me if they were satisfied with the materials they used and where I could get them.

John Dzaugis giving us a friendly barn tour at www.StoneRoseFarm.com Sturbridge Massachusetts.

Eric’s plans


My first major obstacle was finding some barn plans. I scoured the Internet and asked around. Everyone was interested in building a barn for me, but not selling me a set of plans. I sent off countless e-mails and received very few responses. There were plenty of engineers and builders that wanted thousands of dollars to draw up some plans. Finally I met a local timber framer that agreed to draw up my plans and include a timber list for $600. Eric ended up cashing my check before the plans were complete and then the plans turned out to be incorrect.
I wanted a post on each corner of the 10’ by 12’ stalls. Eric’s plans displayed a post for 12’ by 12’ stalls. I wanted a 12 pitch roof to keep my rafter angles at simple 45 degree cuts. Eric’s drawings didn’t show the correct angles and the rafters didn’t end up being long enough to get a steep enough pitch. The beam list ended up having the wrong sizes and not enough floor joists. The “plans” looked like scribbles on ordinary 8” x 11.5” paper that was nothing more than a rough draft. They certainly weren’t drawn t

This is what I paid $600 for? The observation deck is “scribbled out?” Where’s the 45 degree angles? I wanted a post every 10 feet, not 12, because that gives me 12, 10x12 stalls instead of 10, 12x12’s…like we discussed and YOU wrote down?

When I called Eric and tried to remedy the matter the games began. I never had trouble finding Eric before but now he wasn’t around his shop when ever I stopped by. Phone calls weren’t returned. I ran out of patience and had to pay $19 at the Palmer District Small Claims Court to get a straightforward explanation, completed plans or my money back. It was the only time I couldn’t resolve a difference over a cup of coffee.
Eric ended up doing me a favor because closer inspection of his frames revealed poor engineering and craftsmanship. Some of his frames had basic errors that I wouldn’t expect from an experienced frame builder. Often, the way he set his beams (hanging them on the tenon instead of a shoulder) caused the frame to be unnecessarily weak. At one of his barns, chunks of wood were glued back into where they should have never been cut (a real eyesore). If Eric’s character was as poor as his craftsmanship, I might have ended up with a barn that was unsafe. I would have probably paid more when he made mistakes or as I discovered that he wasn’t building what I asked for.

Shoddy joinery


When you just peg a tenon without resting the remainder of the beam on a shoulder or housing, you may as well have a beam only as big as the tenon because the rest of the beam is for show, not structure!

Unfortunately, I had the timbers cut and milled because of the timing of the logging I was doing on my property. I had already made a deal with David Place, of Specialty Forestry and Logging of Monson, Massachusetts and I didn’t want to renegotiate or delay. I ended up with junk barn plans and a bunch of timbers that I wasn’t sure were correct. Now, I would have to make them work.

The show must go on! My son Henry plays while I stack the milled timbers.


After checking with several builders, I signed up for Will Beamer’s, barn building school www.heartwoodschool.com in Becket, Massachusetts. It was a two week introductory school on timber framing. Most of the students were interested in an apprenticeship to the trade or learning about building their own timber framed home. A few builders wanted to know how to repair old barns.

I could have built my barn without going here, but I learned a lot by going!


I got a taste of what I needed to know and was able to ask as many questions as I could think of. Will gave me an audience one evening for about an hour and we discussed about twelve different ways that I could build my barn with the timber that I had, without cutting down a whole new beam list. We figured on which timbers I could salvage and sized some additional beams to ensure structural strength.
Most importantly I met Greg Searfass, an apprentice from Pennsylvania. Greg was 5’2”, 114 pounds, but had lots of experience with tools and log homes. What Greg lacked in size he made up for in inspiration and determination.
I learned that several timber framers are purists and consider it a mortal sin to whip out certain power tools or steel hardware, even if it made sense. What I liked about Greg was that he wasn’t afraid to explore alternative ideas to timber framing, such as using laminated plywood for a connecting spline instead of special milled oak. Greg was practical.

Greg Searfass (610)398-3365 and his power tools & plywood splines.


If there is one thing I learned, there is more than one way to skin a cat, and even more ways to build a barn. Be cautious if you talk to a builder that claims there’s only one way! One builder insisted that I needed a ridge beam at the peak of my frame. Now, the barn stands just fine without it. Basically, its just the way he prefers to build. Another framer suggested that I have seven custom beams, 10”x 10” x36’ long milled and delivered. Just the logistics of moving that sort of beam around is completely unnecessary and burdensome, never mind the extreme additional cost.
There are some wild ideas that people come up with when they don’t have to pay for them or make them work. I discovered a phenomenon that I call the “Bumping Up Theory”. If you discuss your timbers with a framer that is not actually building your barn, you can expect him to bump up the strength and safety factors by at least one or more times. For example, if you need 6” x 6” posts, he’ll probably agree but suggest 8” x 8”’s. If you think that two feet of concrete is plenty for a footing, the cement guy will probably want two and a half feet.

Foundation


I could have used 6”x6”’s, or sono tubes, but these concrete slabs will settle evenly below the frost line and hold plenty of weight. I used pressure treated wood for any part of the barn near the ground, including the sills. These are 8”x8”x4’. I’m drilling holes in the concrete to place rebar pegs in to locate my foundation posts.

No one wants to be responsible if your barn falls down so it can be difficult to get accurate answers. One way around this problem is to look at as many frames as you can, especially old ones. Nothing illustrates deficient engineering better than a less than one hundred year old barn with a sagging beam. You may have to make some tough decisions regarding strength and cost. Get second opinions and take your time. The truth has a way of emerging from the abundance of misinformation if you ask enough people the same question.
The most sophisticated framers can engineer exact specifications to cut cost and waste. You can save thousands of engineering dollars by over building your structure and using common sense. But then again, how many people have common sense?

"Unfortunately, common sense is the least common of all the senses." Mark Twain

If I decided to build barns I’d offer my design because I know it works. It’s a modular design that is built the same way if you have two stalls or two hundred, and I know mine is not going to fall over. In fact, if there is a hurricane, I’m hiding out in the barn with my family instead of the house! Some framers told me the design was boring because it was simple and repetitious. I like boring!
Greg had some experience drafting, and offered to fix my plans. He had some time on his hands during the evenings away from Pennsylvania so we struck a deal. Later, his apprenticeship didn’t work out. When it was time to begin working for a big framing company, Greg found the menial tasks of counting pegs and oiling timbers to be more like slave labor instead breaking into the craft. He was a little old to put his time in for several years before he could be trusted to start cutting out joinery and develop frame designs. He wanted to get started putting up his own barn and I was ready to go with timbers and a foundation.

Greg’s plans


You may prefer a ridge beam, but you don’t NEED a ridge beam. Greg’s plans were much better than Eric’s AND if he got crushed by a timber, then I could finish my barn after the funeral! (please excuse my warped sense of humor).

On October 20th, 2003, Greg arrived to stay in our guest room. The next day we got started. I had some vacation time saved and I work a swing shift schedule. My general plan was to take off my day shifts and work my evening shifts. That way I could work on the barn during daylight hours and go to my regular job when it was mostly dark.
Greg verified measurements and the levelness of the foundation using a simple water jug and clear hose. He taught me how to make 3 foot and 4 foot braces, and then set me loose to cut some 144 of them. It was easy, repetitious work that needed to be done. I was happy to complete the simple work while he started to draw on the timbers to lay out the frame.

Using a jug of colored water, clear tubing and physics to check if its level.

Levelling


I ordered one inch and quarter inch pegs from Northcott in New Hampshire. I could have made my own pegs but buying theirs was much more time and cost effective. I met a young builder that decided to cut down a tree with an axe and then hand hew his posts and beams, just like the colonists. I think he finished one or two beams before he realized just how long that takes.
Before long Greg showed me how to use a $1500 Makita Chain Mortiser and I was cutting out holes for the braces in the posts and beams. Other than the mortiser, the tools were simple, (a table saw, a ½ inch drill, Skil saw, ½ inch router, a 4” grinder, a hammer and a 1 ½ inch chisel). Later I bought a DeWault sliding miter saw that wasn’t necessary, but saved tons of labor while making very precise cuts.

Greg with the Makita chain mortiser. You can buy one on www.tylertool.com


Greg and I were good team. He was the brains and I was the brawn (I’m sure both features were arguable!) It didn’t make sense to me to pay Greg to do things that I could do. The more boring the job, the more pleased I was to finish it myself. That’s where the cost savings is. I made it clear that I was the paying customer and the boss, but of course, I treated Greg with respect for his skill and experience. Since this was Greg’s first actual timber frame from start to finish, I laid out a few ground rules.
The first rule in any job should be safety. I briefed at the beginning of every day that no project was worth getting hurt over. You can’t get anything done after you get hurt.
We would work at a good pace but would take a time out when things weren’t going right. We wore protective clothing and would just plain stop and take a second look when we had that funny feeling. As a helicopter pilot, I prefer to prevent accidents instead of trying to react to them. When Greg and I used the backhoe to locate timbers, we contemplated what could go wrong before we set machinery and heavy timbers into motion. We’d place safety straps and temporary braces where we could in case parts began to fall. We communicated alternate plans and escape routes for each movement.

Every time we lifted something I had a plan in my mind of which way to run!


Each year, plenty of workers are killed or injured just by machinery running over them. That’s one of the reasons why big trucks now go BEEP, BEEP, BEEP when they back up. And that’s only one of one million mishaps that can occur. Greg and I had a rule that if we began to get frustrated or feel urgency in any phase, that we would just stop and take a five minute break.

Protective clothing including eyes, ears and gloves!


Another rule that saved me lots of time and money is, “I don’t pay to have my builder drive to the lumber yard”. A professional that is prepared doesn’t forget that he’s running low on nails or pegs or tools or clothes or etc. I wasn’t happy that we ran out of pegs on a Friday evening just after all the local timber framers closed up shop. Because I could lose my borrowed backhoe to a real construction job at a moment’s notice, I had to drive to New Hampshire at night in the middle of one of New England’s worst snowstorms. I couldn’t afford to hold up the project and then have to wait for the backhoe to return to the job. The whole situation could have been avoided if the correct number of pegs were calculated and ordered before assembling.
I had agreed to pay Greg half to start fixing the plans and the other half when he was finished, “….including counting up all of the pegs…” My words were almost prophetic. It all worked out in the end but that was one rough spot that could have been avoided. Maybe I expect lot from people I hire, but where I work, people expect a lot out of me.
Golden Rule "Do unto others as I would have them do unto me." That’s how I strive to live and hope people that work with share that belief. Most important is, “Do what you say you are going to do, even if its not what I want you to do”. Communication is the key to teamwork and the most important part of communication is feedback. I tell my friends that I don’t need positive information, I need accurate information, even if its bad news. I can make better plans that way. I had a “friend” that Just call me so that I know to call someone else. It sure beats waiting for you and not getting anything done. If you broke the tape measure then just tell me so I can buy a new one. Don’t wait to mention it until we really need it and we don’t have one.
All these principles may be taken for granted but it’s important to establish and reinforce them. There are enough obstacles to building a big barn without having the headaches of miscommunication.

Thermometer


Weather was one of the biggest problems to overcome. I never did get a proper temporary shelter to construct the barn. We started off with inexpensive tarps with aluminum frames. They worked for a little while and then were demolished during some high winds. I tried to move on to some tarps over the partially constructed frame, but the wind ripped those to shreds too. If I had to do it again, I would buy a metal garage port that I saw at WalMart last week for about $500. I’ve seen the $1095 version but the WalMart one was pretty much the same thing.

Shelter


This tarp with aluminum frame was very practical and economical, but was eventually demolished by the wind. Here it sags under a wet snow.

Big Tarp


Next I used a huge tarp ($100) over the frame. I laid boards down to protect it but the winds tore it to shreds anyway.

Canvas


The canvas tarp held up the best and only got ripped in half. It dripped in the rain.

Chalked then routed


On real bad weather days I decided to make my own sign in my garage. I screwed together some scrap wood, hacked and grinded it into an oval. Then I used chalk to mark where I wanted to rout out some lettering.

Sign


Greg and Lisa laughed at me and told me I was wasting my time, but then they had to agree that the sign came out pretty good!

I must have hand lifted over ten million pounds. You would be surprised how many times you have to handle the same piece of wood before it goes into place. I tried to set up my work space to be as efficient as possible. That means move your saw near the wood pile and then put the cut piece of wood into a wagon or wheelbarrow.
Saving money is great but eventually you have to buy materials. I probably built my own barn for half of the cost of having someone else do it but the savings is mostly in labor. You can shop around but cement, roofing and screws cost a certain amount of money. So if you want to save money, take the time to get the best deal and do as much as you can yourself if you have the time. You should be watching the price of materials for months before you buy. Sometimes you get lucky like I did and end up with a set of free replacement windows not good enough for a house but plenty good for my barn.
When Greg got ready to head back home for Thanksgiving, I asked him to lay out as much joinery as he could before he left. That way, I could save some labor by cutting them out while he was gone.

Chisel


We had an unusually warm Thanksgiving morning in 2003. I cut out some joinery while Greg headed home to PA. The more you do, the more you save!

Our plan of attack was to cut and assemble the first section of the structure just to make sure everything worked out. We didn’t want to take the chance of cutting out the whole frame in case it didn’t fit together like we thought it would. After that all worked out, it was a matter of just repeating what we accomplished. After a good breakfast, we’d flip on the radio and start cutting out beams. We numbered them and stacked them for later assembly.

Section


Here’s the first standing portion of the barn to make sure everything fits before we cut the rest. Notice the straps and bracing to keep things from falling during assembly.

Stacked


Cut, stacked and numbered. I’m glad that pine is easier to lift when it dries out!

You can plan on screwing up a few beams but we did pretty well. I did end up losing my concentration and cutting a mortise longer than called for. In that case, an easy fix was to fit a block of wood to fill the hole and hide the mistake. The beam is still functional and it will take you all day to find it in the barn after I rubbed a little dirt on it to blend the seam! You should figure on some spare timbers in case you make a big oops or in case a bunch of ants crawl out of a cut you made like happened to us.

Peg and Connected


Attaching the barn to the “foundation” was accomplished by a peg.

Connected


I used pressure treated 8”x8”’s on top of rebar reinforced concrete for a foundation. I plan on having hay on the second floor so I didn’t want all that weight to cause a settling problem. A perimeter frost wall and piers would have used more cement and I didn’t want the horses constantly chipping their hoofs when they used their walk-outs.

Gap


Sometimes things don’t go as planned like this ½ inch difference, or a steel brace I decided to bolt under the ground just to make sure the corner post didn’t kick out. Don’t sweat the small stuff.

Buried Steel

Trail ride


Greg needed a break after seeing me bolt that steel beam in the ground to shore up the corner post. I suggested some trail riding in the rain to take his mind off from de-bugging the job.
The foundation works well but it wasn’t without its problems. After backfilling the dirt, the pressure treated timbers moved in the increments of inches. Some of them needed the persuasion of a sledgehammer to make them line up properly! In the winter the frozen ground had to be chipped with a steel pitch bar for some wiggle room.

Lineup


After a few years of sitting in the ground, foundation timbers moved a little left and right. That meant I had to chip away at the frozen ground to line them up later with a sledgehammer and some come-alongs.

Chipping frozen ground


After assembling the first floor, then there was the task or laying down the 1 ½ inch decking (flooring). I decided to use decking screws instead of a nail gun. Maybe a nail gun is faster but I’ve noticed that over the years of repairing things and changing boards, its just easier for me to unscrew the old board with a cordless drill. I ended up using over 75 pounds of 2 ½ inch deck screws. The difference of buying a 25 pound container at Home Depot versus the local lumber yard was $25. That was $75 savings right there.

Makita


I used this Makita drill to drive 75lbs of decking screws. I t came with two batteries that I’d just swap from the charger to keep on truckin’

Trap doors for feeding

I took a little extra time to build trap doors above each stall hayrack. And I decided to use a recessed pull ring so I wasn’t tripping on the handle to the trap door every time I walk over them. The trap doors cut down on physical effort and feeding time.

Trap and Open


I also chose to build ladders instead of steps. Steps are much nicer but they take up a lot of room. Maybe when I’m older I’ll have to put steps in there.
I’ve heard plenty of discussion about working with green or seasoned timbers. My whole barn is white pine and most of my timbers were stacked for just about three years. Seasoned pine was easier to carry and cut. Some twisted during drying but not too many.

Ladder


Once I titled up this homemade ladder, it took up much less room than stairs.

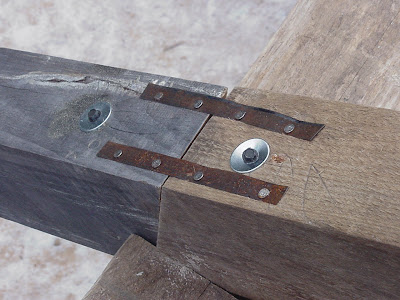
I used more pegs than I had to. You could say that many of them are ornamental. If you are going to have pegs, you may as well show them off. I also have some steel, but I hid it well. I have a split rafter (meaning one half of the rafter is from the drip edge to a girt on the second floor, and the rest of the rafter is a second 4”x7” timber up to the peak. Each rafter is secured with three timber locks (a 10” thin steel screw) and also joined by steel straps. Nothing fancy on the straps since they were snipped lumber banding secured by some penny nails.

Split


I used some steel but it doesn’t show. Timberlocks, washers, and banding straps for my split rafter. That and the steel roof keeps them in place.

Pegs


There’s more pegs than I really needed but it looks nice. Plenty of height in the aisle for vehicles and horses, plus it allows for ventilation and for the windows to be too high for horses to break.

Aisle


The steel roof provides even more structure to keep the rafters from swaying. I chose a 30 year Everlast II roof (they guarantee is won’t rust for at least thirty years) that comes in three foot sections and is custom cut to length. I got what I thought was a great deal through my local Hardwick Farmer’s Exchange www.hardwickfarmers.com . You need about three people for that job and it wasn’t that difficult at all. I hired some handymen but it turned out that I could have done the work myself as long as I had two more friends that weren’t afraid of heights.

Roofing


Three people worked well for the roofing. Here we have four (and my Dad “supervising”. You can see some timbers balancing on the peak that later become the observation deck. It took three days to attach purlins and roof. You use self-threading screws with rubber gaskets to attach the roof to the purlins. No pre-drilling needed.

Greg stayed on for the frame but was done before the roofing, siding (skin) and stalls. It was more economical for me to finish the rest myself and he was missing home. One thing that drove him crazy was that I wanted an observation deck on top of my barn. I thought it would be a shame to have such a high building without a good place to sit and watch the stars or survey the property from. To keep things simple, I designed the timbers to sit on top of the completed roof. I used some timberlocks up through the rafters and metal roofing to secure the legs of the observation deck. Its real sturdy and doesn’t leak. I built a lid type cover to access the deck from the third floor. So my barn has four floors if you count the observation deck.

Stacking


We stacked each floor instead of using a crane to hoist bents.

Peak